Wednesday, April 17, 2013

QTP code to search data from Excel sheet

QTP code to search data from Excel sheet

Dim appExcel, objWorkBook, objSheet, columncount, rowcount,

'Create the application object for excel
Set appExcel = CreateObject("Excel.Application")

'Set the workbook object by opening 
Set objWorkBook = appExcel.Workbooks.open("c:\Smoke_Test\SmokeTest.xls")

'Set the Worksheet object
Set objSheet = appExcel.Sheets("Global")

'Get the count for total used columns
columncount = objSheet.usedrange.columns.count

'Get the count for total used rows
rowcount = objSheet.usedrange.rows.count

'Assign the data to search for
Find_Details="Report"

'Iterate the loop through each cell to find out required data 
For a= 1 to rowcount
For b = 1 to columncount
fieldvalue =objSheet.cells(a,b)
If  cstr(fieldvalue)= Cstr(Find_Details) Then
msgbox cstr(fieldvalue)
Exit For
End If
Next
Next

QTP Methods

QTP Methods


       QTP methods are used to extract the properties of a selected object in an application, There are some list of properties that comes under QTP methods,
  1. Capture Bitmap
  2. Child Objects
  3. GetRoProperty
  4. GetToProperty
  5. GetToProperties
  6. SetToProperty
  7. GetVisibleText
  8. GetItem
  9. GetContent
  10. GetItemsCount       
Note: The properties under 8, 9, 10 indicates the (List & Combobox) so using the above properties we can enhance the qtp scripts more effective as per the business requirements with respect to the project

Steps to follow before starting Automation

Steps to follow before starting Automation

Analyze the Manual Test Cases
           
          a) Requirement Test suite creation
          b) Application Stability
          c) Implement the frame work

                     i) Linear Framework
                     ii) Data driven Framework
                     iii) Modular Framework
                     iv) Key-Word driven Framework
                      v) Hybrid Framework

Child Objects Method in QTP

Child Objects Method in QTP


 Child Objects

              This method will display the count of the needed objects that we needed specifically from the application.

For Example:

           1. We might be need the no. of Links (Links)
           2. We might be need the no. of Buttons (WinButton, WebButton)
           3. We might be need the no. of Editbox (WinEdit, WebEdit)  

To display the count of the objects present in the same name we can declare the below syntax.

Example: 1

'Display the count of the links present in the google page:

Set lnk=Description.Create
lnk("micclass").value="Link"
Set brw=Description.Create
brw("name").value="Google"
Set olinks=Browser("name:=Google").Page("title:=Google").ChildObjects(lnk)
msgbox olinks.count

Example: 2

'Display the count of the buttons present in the qtp default flight application landing page:

Set btns=Description.Create
btns("micclass").value="WinButton"
Set dlg=Description.Create
dlg("name").value="Login"
Set ocollection=Dialog("text:=Login").ChildObjects(btns)
msgbox ocollection.count

Example: 3

'Display the count of the Edit Boxes present in the qtp default flight application landing page:

Set btns=Description.Create
btns("micclass").value="WinEdit"
Set dlg=Description.Create
dlg("name").value="Login"
Set ocollection=Dialog("text:=Login").ChildObjects(btns)
msgbox ocollection.count

Friday, August 17, 2012

QTP11 Supports Chrome

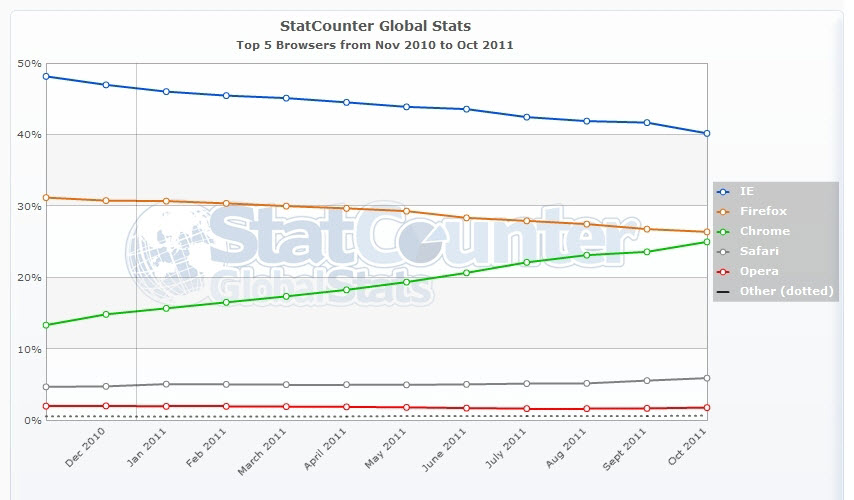
After the release of Google Chrome in September’08, it has gained a significant browser share in the already hot browser market. As suggested by the green line below, this has come at the expense of giants like IE and Firefox.
(Click on the image below to view full image)
Click on this image to view full image
With Google Chrome gaining a significant browser share on the web and already touching 25% mark, it was imperative for HP to integrate Chrome capabilities with QTP. QTP 11 now provides replay support for Google Chrome browser. You would need to download and install the patch QTPWEB_00088.EXE available at HP’s support site.
Some important points to note:
  • This patch only provides replay support and not record support on Google Chrome.
  • It won’t support multiple tabs or multiple browsers in Google Chrome as available on Firefox/IE
  • These web environment are not supported yet. SAP Web, Siebel, Java,.NET WebForms. Web Extensibility based test objects won’t work either.
  • These methods are not supported on Google Chrome
    • Browser.Home
    • Browser.FullScreen
    • Browser.ClearCache
    • Browser.Object
All in all this patch needs a lot of refinement but still can be regarded as a good start in the direction of Google Chrome support, which was non-existent till now. As has happened with Firefox, you can expect some considerable improvement with Google Chrome support over a period of time.

QTP Descriptive Programming

Introduction to Descriptive Programming.
How to write Descriptive Programming?
When and Where to use Descriptive programming?
Some points to note with Descriptive Programming.


Introduction to Descriptive Programming:Descriptive programming is used when we want to perform an operation on an object that is not present in the object repository. There can be various valid reason to do so. We will discuss them later in this article.

How to write Descriptive Programming?

There are two ways in which descriptive programming can be used

1. By giving the description in form of the string arguments.
2. By creating properties collection object for the description.

1. By giving the description in form of the string arguments.

This is a more commonly used method for Descriptive Programming.
You can describe an object directly in a statement by specifying property:=value pairs describing the object instead of specifying an object’s
name. The general syntax is:

TestObject("PropertyName1:=PropertyValue1", "..." , "PropertyNameX:=PropertyValueX")

TestObject—the test object class could be WebEdit, WebRadioGroup etc….

PropertyName:=PropertyValue—the test object property and its value. Each property:=value pair should be separated by commas and quotation
marks. Note that you can enter a variable name as the property value if you want to find an object based on property values you retrieve during a run session.

Consider the HTML Code given below:

<--!input type="”textbox”" name="”txt_Name”"-->
<--!input type="”radio”" name="”txt_Name”"-->

Now to refer to the textbox the statement would be as given below

Browser(“Browser”).Page(“Page”).WebEdit(“Name:=txt_Name”,”html tag:=INPUT”).set “Test”

And to refer to the radio button the statement would be as given below

Browser(“Browser”).Page(“Page”).WebRadioGroup(“Name:=txt_Name”,”html tag:=INPUT”).set “Test”

If we refer to them as a web element then we will have to distinguish between the 2 using the index property

Browser(“Browser”).Page(“Page”).WebElement(“Name:=txt_Name”,”html tag:=INPUT”,”Index:=0”).set “Test” ‘ Refers to the textbox
Browser(“Browser”).Page(“Page”).WebElement(“Name:=txt_Name”,”html tag:=INPUT”,”Index:=1”).set “Test” ‘ Refers to the radio button

To determine which property and value pairs to use, you can use the Object Spy:
1. Go to Tools -> Object Spy.
2. Select the "Test Object Properties" radio button.
3. Spy on the desired object.
4. In the Properties list, find and write down the properties and values that can be used to identify the object.


2. By creating properties collection object for the description.

Properties collection also does the same thing as string arguments. The only difference is that it "collects" all the properties of a particular object in an instance of that object. Now that object can be referenced easily by using the instance, instead of writing "string arguments" again and again. It is my observation that people find "string arguments" [1] method much easier and intuitive to work with.
To use this method you need first to create an empty description
Dim obj_Desc ‘Not necessary to declare
Set obj_Desc = Description.Create

Now we have a blank description in “obj_Desc”. Each description has 3 properties “Name”, “Value” and “Regular Expression”.

obj_Desc(“html tag”).value= “INPUT”

When you use a property name for the first time the property is added to the collection and when you use it again the property is modified. By default each property that is defined is a regular expression. Suppose if we have the following description

obj_Desc(“html tag”).value= “INPUT”
obj_Desc(“name”).value= “txt.*”

This would mean an object with html tag as INPUT and name starting with txt. Now actually that “.*” was considered as regular expression. So, if you want the property “name” not to be recognized as a regular expression then you need to set the “regularexpression” property as FALSE

obj_Desc(“html tag”).value= “INPUT”
obj_Desc(“name”).value= “txt.*”
obj_Desc(“name”).regularexpression= “txt.*”

This is how we create a description. Now below is the way we can use it

Browser(“Browser”).Page(“Page”).WebEdit(obj_Desc).set “Test”

When we say .WebEdit(obj_Desc) we define one more property for our description that was not earlier defined that is it’s a text box (because QTPs WebEdit boxes map to text boxes in a web page).

If we know that we have more than 1 element with same description on the page then we must define “index” property for the that description

Consider the HTML code given below

<--!input type="”textbox”" name="”txt_Name”"-->

Now the html code has two objects with same description. So distinguish between these 2 objects we will use the “index” property. Here is the description for both the object

For 1st textbox:
obj_Desc(“html tag”).value= “INPUT”
obj_Desc(“name”).value= “txt_Name”
obj_Desc(“index”).value= “0”

For 2nd textbox:
obj_Desc(“html tag”).value= “INPUT”
obj_Desc(“name”).value= “txt_Name”
obj_Desc(“index”).value= “1”

Consider the HTML Code given below:

<--!input type="”textbox”" name="”txt_Name”"-->
<--!input type="”radio”" name="”txt_Name”"-->

We can use the same description for both the objects and still distinguish between both of them
obj_Desc(“html tag”).value= “INPUT”
obj_Desc(“name”).value= “txt_Name”

When I want to refer to the textbox then I will use the inside a WebEdit object and to refer to the radio button I will use the description object with the WebRadioGroup object.

Browser(“Browser”).Page(“Page”).WebEdit(obj_Desc).set “Test” ‘Refers to the text box
Browser(“Browser”).Page(“Page”).WebRadioGroup(obj_Desc).set “Test” ‘Refers to the radio button

But if we use WebElement object for the description then we must define the “index” property because for a webelement the current description would return two objects.

Getting Child Object:

We can use description object to get all the objects on the page that matches that specific description. Suppose we have to check all the checkboxes present on a web page. So we will first create an object description for a checkboxe and then get all the checkboxes from the page

Dim obj_ChkDesc

Set obj_ChkDesc=Description.Create
obj_ChkDesc(“html tag”).value = “INPUT”
obj_ChkDesc(“type”).value = “checkbox”

Dim allCheckboxes, singleCheckBox

Set allCheckboxes = Browse(“Browser”).Page(“Page”).ChildObjects(obj_ChkDesc)

For each singleCheckBox in allCheckboxes

singleCheckBox.Set “ON”

Next

The above code will check all the check boxes present on the page. To get all the child objects we need to specify an object description.

If you wish to use string arguments [1], same thing can be accomplished by simple scripting.

Code for that would be:

i=0
Do While Browse(“Browser”).Page(“Page”).WebCheckBox("html tag:=INPUT",type:=checkbox, "index:="&i).Exist
Browse(“Browser”).Page(“Page”).WebCheckBox("html tag:=INPUT",type:=checkbox, "index:="&i).Set "ON"
i=i+1
Loop
Possible Operation on Description Objects

Consider the below code for all the solutions
Dim obj_ChkDesc

Set obj_ChkDesc=Description.Create
obj_ChkDesc(“html tag”).value = “INPUT”
obj_ChkDesc(“type”).value = “checkbox”

Q: How to get the no. of description defined in a collection
A: obj_ChkDesc.Count ‘Will return 2 in our case

Q: How to remove a description from the collection
A: obj_ChkDesc.remove “html tag” ‘would delete the html tag property from the collection

Q: How do I check if property exists or not in the collection?
A: The answer is that it’s not possible. Because whenever we try to access a property which is not defined its automatically added to the collection. The only way to determine is to check its value that is use a if statement “if obj_ChkDesc(“html tag”).value = empty then”.

Q: How to browse through all the properties of a properties collection?
A: Two ways
1st:
For each desc in obj_ChkDesc
Name=desc.Name
Value=desc.Value
RE = desc.regularexpression
Next
2nd:
For i=0 to obj_ChkDesc.count - 1
Name= obj_ChkDesc(i).Name
Value= obj_ChkDesc(i).Value
RE = obj_ChkDesc(i).regularexpression
Next

Hierarchy of test description:

When using programmatic descriptions from a specific point within a test object hierarchy, you must continue to use programmatic descriptions
from that point onward within the same statement. If you specify a test object by its object repository name after other objects in the hierarchy have
been described using programmatic descriptions, QuickTest cannot identify the object.

For example, you can use Browser(Desc1).Page(Desc1).Link(desc3), since it uses programmatic descriptions throughout the entire test object hierarchy.
You can also use Browser("Index").Page(Desc1).Link(desc3), since it uses programmatic descriptions from a certain point in the description (starting
from the Page object description).

However, you cannot use Browser(Desc1).Page(Desc1).Link("Example1"), since it uses programmatic descriptions for the Browser and Page objects but
then attempts to use an object repository name for the Link test object (QuickTest tries to locate the Link object based on its name, but cannot
locate it in the repository because the parent objects were specified using programmatic descriptions).


When and Where to use Descriptive programming?

Below are some of the situations when Descriptive Programming can be considered useful:

1. One place where DP can be of significant importance is when you are creating functions in an external file. You can use these function in various actions directly , eliminating the need of adding object(s) in object repository for each action[If you are using per action object repository]
2. The objects in the application are dynamic in nature and need special handling to identify the object. The best example would be of clicking a link which changes according to the user of the application, Ex. “Logout <>”.

3. When object repository is getting huge due to the no. of objects being added. If the size of Object repository increases too much then it decreases the performance of QTP while recognizing a object. [For QTP8.2 and below Mercury recommends that OR size should not be greater than 1.5MB]

4. When you don’t want to use object repository at all. Well the first question would be why not Object repository? Consider the following scenario which would help understand why not Object repository
Scenario 1: Suppose we have a web application that has not been developed yet.Now QTP for recording the script and adding the objects to repository needs the application to be up, that would mean waiting for the application to be deployed before we can start of with making QTP scripts. But if we know the descriptions of the objects that will be created then we can still start off with the script writing for testing
Scenario 2: Suppose an application has 3 navigation buttons on each and every page. Let the buttons be “Cancel”, “Back” and “Next”. Now recording action on these buttons would add 3 objects per page in the repository. For a 10 page flow this would mean 30 objects which could have been represented just by using 3 objects. So instead of adding these 30 objects to the repository we can just write 3 descriptions for the object and use it on any page.

5. Modification to a test case is needed but the Object repository for the same is Read only or in shared mode i.e. changes may affect other scripts as well.
6. When you want to take action on similar type of object i.e. suppose we have 20 textboxes on the page and there names are in the form txt_1, txt_2, txt_3 and so on. Now adding all 20 the Object repository would not be a good programming approach

Verifying items in combo list / Drop down list

Verifying items in combo list / Drop down list.

Cnt=Browser("Browser").Page("page").WebList("weblist").GetROProperty("items count")
For i=1 to cnt step 1
Browser("Browser").Page("page").WebList("weblist").select (i)
Browser("Browser").Page("page").WebButton("button").Click
Next

External Data Sheet - Excel 2

Introduction of External Data Sheet

In QTP, we have an option for Data Table which comes very useful when the user wants to parameterize his/her test. The parameters set by user appear by default in the Columns of the sheet. Not only is this helpful for parameterized operation of your test also when you want to work with the Output function of QTP you can use this table since the corresponding outputs can be viewed over here.
This option can be as per the user requirement and in this the user can make an Excel sheet with the required parameters in it. Also one can import and export the contents to his test while running it.

Import External Data File

The user shall perform the following operations:
In this once the user has created the Excel sheet and has recorded the test, (s)he shall right click on any of the cells in the Data Table and select the File>Import, user will get a window where (s)he will have to select the exact location of the excel sheet.
clip_image002

On Clicking the option, user will get a window pop-up box asking whether you will want to replace the contents of the current data table with the ones in the excel sheet. Click OK and proceed.
Select the exact location of the excel file on your PC which you want to import.
The contents of the excel sheet shall appear in the Data Table of QTP once you selected the required excel sheet.
Remember to use the same naming convention through-out the script, you have used in the file. Each of the column name in your excel file will become one parameter.
Secondly the actions for which the user shall be setting parameters need to be given the same name as in the imported excel file. As shown below, while recording the file the user has selected a particular value for the Action which he wants to parameterize which will appear in the constant option.
clip_image002[1]
The user has to choose the Parameter option and then type the exact name as in the Data table for e.g.: “No_Pass”, here we are parameterizing the no of passengers for whom the tickets have to be booked and will re-run the script for that much time.
clip_image002[3]
Points to note regarding which location to select OR whether to make a sheet global or local.
  1. Globally implies the user has the Global sheet of the data table filled up with certain data. Now when he runs the test it will operate for the amount of rows that are filled in this sheet.
  2. If you want a condition that for single row run of the global sheet there should be run of another sheet namely the “Action 1” of the data table we call the operation as Local.
  3. In this it is important that the user selects the Parameter option as local and not global as in the above condition and the required contents will come in Action 1 sheet.
  4. Now initially if while you are importing if there were two sheets created by you then by default the contents of the second sheet will be Action 1. It is only that the corresponding Action be parameterized properly.
clip_image002[5]
Now, In the keyword view, Right click on the Action 1 and select Action Call Properties and then in the Run Tab select the no of rows for which you want to run the Local sheet.
When the user runs this script, for every single row of the Global sheet, the Action 1 sheet will run for all of its respective columns.
A similar method can be used to import a single sheet or a database file.

Also from within the script you can use Datatable.Import("path of file")

Export External Data File

Like importing data sheet we can also export the entire data table into an external excel file. This is basically useful if one wants to use the required parameters in some different test run within QTP.
Similar to the exporting of complete file we can also export an single sheet from the data table

Also from within the script you can use Datatable.Export("path of file")

Using Datatable - QTP with Excel

How can we use the data table to provide input data to an application?

Use the DataTable.Value method to access data from the data table and input it into the application
For data in the Global datasheet:QTP and Excel
1. Open a new script.
2. In column A of the Global datasheet, enter the data in three rows.
3. Go to www.google.com.
4. Begin recording.
5. Type a value into the Google search field.
6. Stop recording.
7. Go to the Expert view. Modify the script so it look like this:
rc = DataTable.Value ("A", dtGlobalSheet)
msgbox rc
Browser("Google").Page("Google").WebEdit("q").Set rc
8. To run all rows in the global data table, go to Test ->; Test Settings -> Run tab, and select "Run on all rows."
For data in the Local datasheet:
1. Start a new script.
2. In column A of the Action1 datasheet, enter the data in three rows:
3. Go to www.google.com.
4. Begin recording.
5. Type a value into the Google search field.
6. Stop recording.
7. Go to the Expert view. Modify the script so it look like this:
rc = DataTable.Value ("A", dtLocalSheet)
msgbox rc
Browser("Google").Page("Google").WebEdit("q").Set rc
8. To run all rows:
  1. Right-click on the Action name in the Tree View.
  2. Go to Action Properites -> Run tab, and select "Run all rows."

Similarly, How can we use the data table to get output data from an application?

Create an Output Value. The text will be placed in the datatable and can be accessed as needed.
1. Once you see the text you want to retrieve, start recording.
2. From the Insert menu, select Output Value, then Text Output Value.
3. Click on the desired text. The "Text Output Value Properties" window will appear.
4. In the window you can verify or set the Before and After text settings.
5. By default the retrieved value will be added to the Global sheet. You can modify the settings by selecting Output Text in the combobox, then clicking Modify.
6. Once satisfied, click OK.
An Output statement will be entered into the script.
Example:Browser("Browser").Page("Page").Output CheckPoint("Text")
msgbox DataTable.Value("PageOutput_Text_out", dtGlobalSheet)
In addition, a column (in the example, PageOutput_Text_out) will be inserted into the datatable(Remember in the runtime datatable), with the output text.
OR Another method to retrieve data during run time is to do just the opposite of what we did above in the first question above.
DataTable.Value(ParameterID [, SheetID])=NewValue
Note:The value property is the default property for the DataTable object. As the default property you do not need to explicitly use .Value.
DataTable(ParameterID [, SheetID]) = NewValue
Example:' Add data to the current row of the Global sheet
DataTable("VarName", dtGlobalSheet) = "new value" ' Using DataTable by itself
DataTable.Value("VarName2", dtGlobalSheet) = "new value2" ' Using .Value
' Add data to the current row of the Local sheet
DataTable("VarName", dtLocalSheet) = "new value" ' Using DataTable by itself
DataTable.Value("VarName2", dtLocalSheet) = "new value2" ' Using .Value

Tuesday, August 7, 2012

Upload Test cases from Excel to Quality Center(QC)

Upload Test cases from Excel to Quality Center(QC)

Writing Test Cases directly to QC is quite a cumbersome task. So To simplify the process, We can create the test cases in an excel sheet and then upload them to QC.
To do so, we have to make sure that the columns used in excel match with the fields/data which we enter in QC. I will explain the steps using an example,--

1. Suppose we have created the test cases in excel in below
untitled

2. Now, next step would be to install the excel addin for QC. To do so, follow the following steps:-
    a. Launch Quality Center
    b. Click on Addins link
    c. Click on More QC Addins link
    d. We can go through the Guide also or this step can be skipped
    e. Click on "download ..." link
    f. Follow the steps of installation
    g. Restart the system

3. Now open the excel sheet containing test cases ns select only the part which needs to be uploaded as shown in the picture below.
untitled

4. Now go to Tools—>Export to Quality Centre. Following window would be displayed. Login with valid credentials.
untitled

5.Click on Next and login with valid credentials. Click Next again.
untitled

6. Select the respective domain and project.
untitled

7. Select ‘Tests’ Radio button and click Next.
untitled

8. Select New Map to store the settings. Give a map name and click next.
image

9. Now, we have to map each column in our excel sheet to specific fields in QC. To do so, click on following from the quality center valued displayed in window and give their respective column numbers.
untitled

10. Window would look like this after selecting all values. Click on next button.
untitled
11. Above steps will upload the test cases in QC at path ‘Iteration1\ModuleABC\xyz’. We can view them in Qc now.
Donot mention the root directory.
If the xyz folder is not present  at Iteration1\ModuleABC in QC, it would be created.
similarly, if the ModuleABC folder itself is not present at Iteration1, The folder and subfolder mentioned would be created.
untitled

Monday, March 12, 2012

Dictionary Objects in QTP

Dictionary object is similar to a typical array. The difference between a dictionary object and an array is that there is a unique key associated with every item of dictionary object. This unique key can help you in calling that item as and whenever required.

Shown below is a typical script.

Dim dict ‘ Create a variable.
Set dict = CreateObject(“Scripting.Dictionary”)
dict.Add “Company”, “HP” ‘ Adding keys and corresponding items.
dict.Add “Tool”, “QuickTest Pro”
dict.Add “Website”, “LearnQTP”
dict.Add “Country”, “India”
dict is an object of class Scripting.Dictionary.

Items Method, Keys Method, Remove Method, RemoveAll Method

Using Exists Method to check whether the key Country exists?

If dict.Exists(“Country”) Then
msg = “Specified key exists.”
Else
msg = “Specified key doesn’t exist.”
End If

Using Items and Keys method to retrieve ALL items and keys respectively from inside dictionary object.

i = dict.Items ‘ Get the items.
k = dict.Keys ‘ Get the keys.
For x = 0 To dict.Count-1 ‘ Iterate the array.
msgbox  i(x) & ” :” & k(x)
Next

Using Remove method to remove Website – LearnQTP pair from the object.

dict.Remove(“Website”)
Using Remove all method to clear the dictionary
dict.RemoveAll ‘ Clear the dictionary.

What are the places where it can be used?

When you want to share data between different actions in a test, dictionary object can be used. To do this you should create a reserved test object for the Dictionary object. Here is a process to set up a reserved dictionary object.

Open Window’s registry by opening a Run window and entering regedit.
  1. Navigate to HKEY_CURRENT_USER\Software\Mercury Interactive\QuickTest Professional\MicTest\ReservedObjects.
  2. Create a new key (folder) named GlobalDictionary by right-clicking on the ReservedObjects key and selecting New -> Key.
  3. Under the new key, create a String value named ProgID by right-clicking on GlobalDictionary and selecting New -> String Value.
  4. Assign “Scripting.Dictionary” to the new ProgID string value by right-clicking on ProgID and selecting “Modify.”
  5. If QTP window is already open you need to close and restart it.
  6. Now to check whether dictionary object was installed successfully in registry, simple write GlobalDictionary. (don’t forget the dot) and you should see a drop-down containing all methods and properties associated with dictionary object.
QTP Dictionary Object

Why dictionary object and why not array only?

As shown in the example above, dictionary object was used with the index (key) being string. In the case of array, the index can be ONLY numeric. Then of course we have some obvious advantages like referencing a value with a meaningful keys etc.

Monday, August 29, 2011

Regular Expression

A regular expression is a string that describes or matches a set of strings. It is often called a pattern as it describes set of strings.

Given underneath is one of the most widely used and ever confused BackLash character. The remaining expressions are serialized below that.

Using the Backslash Character
A backslash (\) instructs QuickTest to treat the next character as a literal character, if it is otherwise a special character. The backslash (\) can also instruct QuickTest to recognize certain ordinary characters as special characters. For example, QuickTest recognizes \n as the special newline character. 
For example:
w matches the character w
\w is a special character that matches any word character including underscore

The period would be mistaken as an indication of a regular expression. To indicate that the period is not part of a regular expression, you would enter it as follows:
mercurytours\.mercuryinteractive\.com Note: If a backslash character is used before a character that has no special meaning, the backslash is ignored. For example, \z matches z.

Expressions & Explanation
Special characters and sequences are used in writing patterns for regular expressions. The following describes the characters and sequences that can be used.


\
Marks the next character as either a special character or a literal. For example, "n" matches the character "n". "\n" matches a newline character. The sequence "\\" matches "\" and "\(" matches "(".

^
Matches the beginning of input.

$
Matches the end of input.

*
Matches the preceding character zero or more times. For example, "zo*" matches either "z" or "zoo".

+
Matches the preceding character one or more times. For example, "zo+" matches "zoo" but not "z".

?
Matches the preceding character zero or one time. For example, "a?ve?" matches the "ve" in "never".

.
Matches any single character except a newline character.

(pattern)
Matches pattern and remembers the match. The matched substring can be retrieved from the resulting Matches collection, using Item [0]...[n]. To match parentheses characters ( ), use "\(" or "\)".

xy
Matches either x or y. For example, "zwood" matches "z" or "wood". "(zw)oo" matches "zoo" or "wood".

{n}
n is a nonnegative integer. Matches exactly n times. For example, "o{2}" does not match the "o" in "Bob," but matches the first two o's in "foooood".

{n,}
n is a nonnegative integer. Matches at least n times. For example, "o{2,}" does not match the "o" in "Bob" and matches all the o's in "foooood." "o{1,}" is equivalent to "o+". "o{0,}" is equivalent to "o*".

{n,m}
m and n are nonnegative integers. Matches at least n and at most m times. For example, "o{1,3}" matches the first three o's in "fooooood." "o{0,1}" is equivalent to "o?".

[xyz]
A character set. Matches any one of the enclosed characters. For example, "[abc]" matches the "a" in "plain".

[^xyz]
A negative character set. Matches any character not enclosed. For example, "[^abc]" matches the "p" in "plain".

[a-z]
A range of characters. Matches any character in the specified range. For example, "[a-z]" matches any lowercase alphabetic character in the range "a" through "z".

[^m-z]
A negative range characters. Matches any character not in the specified range. For example, "[m-z]" matches any character not in the range "m" through "z".

\b
Matches a word boundary, that is, the position between a word and a space. For example, "er\b" matches the "er" in "never" but not the "er" in "verb".

\B
Matches a non-word boundary. "ea*r\B" matches the "ear" in "never early".

\d
Matches a digit character. Equivalent to [0-9].

\D
Matches a non-digit character. Equivalent to [^0-9].

\f
Matches a form-feed character.

\n
Matches a newline character.

\r
Matches a carriage return character.

\s
Matches any white space including space, tab, form-feed, etc. Equivalent to "[ \f\n\r\t\v]".

\S
Matches any nonwhite space character. Equivalent to "[^ \f\n\r\t\v]".

\t
Matches a tab character.

\v
Matches a vertical tab character.

\w
Matches any word character including underscore. Equivalent to "[A-Za-z0-9_]".

\W
Matches any non-word character. Equivalent to "[^A-Za-z0-9_]".

\num
Matches num, where num is a positive integer. A reference back to remembered matches. For example, "(.)\1" matches two consecutive identical characters.

\n
Matches n, where n is an octal escape value. Octal escape values must be 1, 2, or 3 digits long. For example, "\11" and "\011" both match a tab character. "\0011" is the equivalent of "\001" & "1". Octal escape values must not exceed 256. If they do, only the first two digits comprise the expression. Allows ASCII codes to be used in regular expressions.

\xn
Matches n, where n is a hexadecimal escape value. Hexadecimal escape values must be exactly two digits long. For example, "\x41" matches "A". "\x041" is equivalent to "\x04" & "1". Allows ASCII codes to be used in regular expressions.

File handling in QTP


To interact with text files using QTP. Interaction can be(but not limited to) in the form of reading input from a file, writing output to a file.  This post describe in detail "File handling using QTP".
We use FSO object to do this.

What is FSO?
FSO stands for File System Object. This is used to support text file creation and manipulation through the TextStream object and is contained in the Scripting type library (Scrrun.dll)
The FSO Object Model has a rich set of properties, methods and events to process folders and files.


How to create a file?
We first create a FSO object using CreateObject and then create a text file using CreateTextFile.
For Example: Suppose you want to create a file called "test.txt" located in C:
Dim fso, file, file_location
file_location = "C:\file_location"
Set fso = CreateObject(“Scripting.FileSystemObject”)
Set file = fso.CreateTextFile(file_location, True) // True--> file is to be overwritten if                  it already exists else false 
We would use the same example for the rest of this post.
How to open a file?
Set file= fso.OpenTextFile("C:\file_location", ForWriting, True)
//2nd argument can be ForReading, ForWriting, ForAppending
//3rd argument is "True" if new file has to be created if the specified file doesn’t exist else false, blank signify false.
How to read content from a file?
Use ReadLine() method
For example:
Set file= fso.OpenTextFile("C:\file_location", ForReading, True) //2nd argument should always be "ForReading" in order to read contents from a file
Do while file.AtEndofStream <> True
      data = file.ReadLine()
      msgbox data
Loop
How to write content to a file?
You can use  Write() or WriteLine() Methods to write text into a file. The difference between the Write() and WriteLine() Method is that the latter automatically inserts a new line character while the former doesn’t insert a new line character.
For example:
Set file= fso.OpenTextFile("C:\file_location", ForWriting, True) //2nd argument should always be "ForWriting" in order to write contents to a file
file.Write("This is a place to get all your qtp")
file.Write("questions and answers solved.")
//Output will be:
This is a place to get all your qtp questions and answers solved.
 while
file.WriteLine("This is a place to get all your qtp")
file.Write("questions and answers solved.")
//Output will be:
This is a place to get all your qtp
questions and answers solved.
How to delete content?
Use DeleteFile() method to delete a file from a particular location
Foe Example:
file_location = "C:\file_location"
Set fso = CreateObject(“Scripting.FileSystemObject”)
fso.DeleteFile(file_location)

Sunday, May 8, 2011

Datatable

Usage of datatable
 
Use the DataTable.Value method to access data from the data table and input it into the application
For data in the Global datasheet:QTP and Excel
1. Open a new script.
2. In column A of the Global datasheet, enter the data in three rows.
3. Go to www.google.com.
4. Begin recording.
5. Type a value into the Google search field.
6. Stop recording.
7. Go to the Expert view. Modify the script so it look like this:
rc = DataTable.Value ("A", dtGlobalSheet)
msgbox rc
Browser("Google").Page("Google").WebEdit("q").Set rc
8. To run all rows in the global data table, go to Test ->; Test Settings -> Run tab, and select "Run on all rows."
For data in the Local datasheet:
1. Start a new script.
2. In column A of the Action1 datasheet, enter the data in three rows:
3. Go to www.google.com.
4. Begin recording.
5. Type a value into the Google search field.
6. Stop recording.
7. Go to the Expert view. Modify the script so it look like this:
rc = DataTable.Value ("A", dtLocalSheet)
msgbox rc
Browser("Google").Page("Google").WebEdit("q").Set rc
8. To run all rows:
  1. Right-click on the Action name in the Tree View.
  2. Go to Action Properites -> Run tab, and select "Run all rows."

Similarly, How can we use the data table to get output data from an application?

Create an Output Value. The text will be placed in the datatable and can be accessed as needed.
1. Once you see the text you want to retrieve, start recording.
2. From the Insert menu, select Output Value, then Text Output Value.
3. Click on the desired text. The "Text Output Value Properties" window will appear.
4. In the window you can verify or set the Before and After text settings.
5. By default the retrieved value will be added to the Global sheet. You can modify the settings by selecting Output Text in the combobox, then clicking Modify.
6. Once satisfied, click OK.
An Output statement will be entered into the script.
Example:
Browser("Browser").Page("Page").Output CheckPoint("Text")
msgbox DataTable.Value("PageOutput_Text_out", dtGlobalSheet)
In addition, a column (in the example, PageOutput_Text_out) will be inserted into the datatable(Remember in the runtime datatable), with the output text.
OR Another method to retrieve data during run time is to do just the opposite of what we did above in the first question above.
DataTable.Value(ParameterID [, SheetID])=NewValue
Note:
The value property is the default property for the DataTable object. As the default property you do not need to explicitly use .Value.
DataTable(ParameterID [, SheetID]) = NewValue
Example:
' Add data to the current row of the Global sheet
DataTable("VarName", dtGlobalSheet) = "new value" ' Using DataTable by itself
DataTable.Value("VarName2", dtGlobalSheet) = "new value2" ' Using .Value
' Add data to the current row of the Local sheet
DataTable("VarName", dtLocalSheet) = "new value" ' Using DataTable by itself
DataTable.Value("VarName2", dtLocalSheet) = "new value2" ' Using .Value

Friday, May 6, 2011

Sample Code for conditional statements

'Sample Code for conditional statements

a=10
b=20

If a<b Then
    reporter.ReportEvent micPass,"Condition Check","A is less than B"
Else
     reporter.ReportEvent micFail,"Condition Check","B is less than A"   
End If


d=0

For i= 1 to 10
    d = cint(d)+cint(i)
Next

msgbox d


a=0
j=0

While A <=10
    j= cint(j)+ A
    A = cint(a)+1
Wend

msgbox j

'CODE FOR EXECUTION OF COMMAND PROMPT STATEMENTS

'CODE FOR EXECUTION OF COMMAND PROMPT STATEMENTS

Set oshell = createObject("wscript.shell")

oshell.run "cmd /k Net start > c:\services.txt"               'Creates a text file in C:\
oshell.run "cmd /k dir > c:\Dir.txt"                                    'Creates a text file in C:\

Set oshell=nothing

Tuesday, March 15, 2011

Scheduling QTP Script Execution during Out of office

Do you Want to run your QTP scripts when you are not in office/ infront of the computer? Please follow below steps....

1) Create a .vbs file to launch QTP with required settings, add-ins etc.
Here is a sample vbs code
Set App = CreateObject("QuickTest.Application")
App.Launch
App.Visible = True
App.WindowState = "Maximized" ' Maximize the QuickTest window
App.ActivateView "ExpertView" ' Display the Expert View
App.open "C:\Program Files\Mercury Interactive
\QuickTest Professional\Tests\Test1", False  'Opens the test in editable mode

2) ok, for the first timers. Create a sample QTP test and save it as Test1 at the location above. Copy the code into notepad and name the file as testing.vbs 3) Now we will automate the opening of vbs file through Windows Scheduler. Go To Start > Control Panel > Schedule Tasks > Click Add Schedule Tasks Click Next on the screen.
4) Click Browse and and select the .vbs file you just created.You will get this screen
 5) Give a name to the task and select the frequency for performing the given tasks. For this demo we will select "One time only"
 6) Select Start Time and Start Date. For this demo, select Start Time as current time+5 mins and Start date as todays date.
7) Next Screen Enter "UserName", "Password" and "Confirm Password" Click Next and you should get this screen. 
8) Click on Finish and yay, you're done.
Note: The steps above are for Windows XP and may be different for other Operating Systems.

Please feel free to comment on this if any questions.

Tuesday, February 22, 2011

Clicking on all links of Google Search

browser("micclass:=Browser").page("micclass:=Page").webedit("name:=q").Set "QTPPRABHAKAR"
browser("micclass:=Browser").page("micclass:=Page").webbutton("name:=Google Search").Click
browser("micclass:=Browser").Sync
Set oDesc=Description.Create
oDesc("micclass").value="Link"
set lnkList=browser("micclass:=Browser").page("micclass:=Page").childobjects(oDesc)
Set oDictionary=createobject("scripting.dictionary")
For i=0 to lnkList.count-1
    oDictionary.add i,lnkList(i).getROproperty("name")
Next
   LnkProperties = oDictionary.Items
  
For i = 0 To oDictionary.Count -1
   
    If i=oDictionary.count-1 then
        Exit for
    End if
   
    If LnkProperties(i+1)="Cached" Then
        browser("micclass:=Browser").page("micclass:=Page").Link("name:="&LnkProperties(i)).click
        browser("micclass:=Browser").Back
        browser("micclass:=Browser").Sync
    End If
Next

Use of .INI file in QTP

Use of .INI file in QTP

It's used to store user defined external environment variables in 5x and 6x versions of QTP.
Because
of the increased XML usage in all technologies from 8x, QTP is given
a facility to store user defined external environment variables in XML
files. QTP is having backward compatibility so that it will support
.INI files in latest versions of QTP.

How to store environment variables in INI files?

step1: open a notepad file
step2: on top of the file write [Environment]
step3: specify variable names and values
step4: Save it as .ini file
step5: Associate environment file in QTP 
File-->Settings-->environment-->User Defined

EX:-
'************************************************************
[Environment]

URL=www.google.com
ScriptsPath=D:\AutomationProject\

'************************************************************

Creating Comments and Action Template

Creating Comments and Action Template

While editing your test, you can add comments in the Keyword View or in the Expert View. You can also add comments to function libraries. A comment is an explanatory remark in a program. When you run a test, QuickTest does not process comments. You can use comments to explain sections of your tests to improve readability and to make them easier to update. You can add comments directly to the Keyword View or the Expert View, or you can use the Insert Comment dialog box. You can also modify comments at any time directly in the Keyword View or the Expert View, or using the Comment Properties dialog box.

To add a comment in the Keyword View: 

If the Comment column is not visible, right-click any column header and select Comment.

  • To add a comment on the same line as a step, select the step and type your comment in the Comment column.
  • To add a comment on a separate line, select a step and choose Insert > Comment, or right-click a step and choose Insert Step > Comment. The Insert Comment dialog box opens. Type a comment and click OK. A comment statement is added to your test.
To add a comment in the Expert View or a function library: 

Type an apostrophe (') or use "rem" statement and then type your comment. You can add a comment at the end of a line or at the beginning of a separate line.

Example:

'This is a demo test

or
rem this is a demo test
ctrl+m and ctrl+shift+m are the key board short cuts to comment and uncomment a single or bulk statements.
If you want to add the same comment to every action that you create, you can add the comment to an Action Template.

Creating an Action Template
If you want to include one or more statements in every new action in your test, you can create an action template. For example, if you always enter your name as the author of an action, you can add this comment line to your action template. An action template applies only to actions created on your computer.

To create an action template:

Create a text file containing the comments, function calls, and other statements that you want to include in your action template. The text file must be in the structure and format used in the Expert View.
Save the text file as ActionTemplate.mst in your <QuickTest Installation Folder>\dat folder. All new actions you create contain the script lines from the action template.

Note: Only the file name ActionTemplate.mst is recognized as an action template.

'***************************************************************

Sample Action Template
'########################################################
' Objective            :     The objective of the testcase
' Test Case           :     Test Case Name
' Author                :     Author Name
' Date Created       :     XX/XX/XXXX (mm/dd/yyyyy)
' Date Updated      :     XX/XX/XXXX (mm/dd/yyyyy)
'Updated by          :   
'########################################################

'##############Initialize Variables and Load Libraries##################

'-----------Write Statements to initialize Variable and to execute libraries

'#####################
Driver Script ##########################


'-----------Write the main Script here


'########################################################

'############## Report Generation & Memory Cleanup ################

'-----------Write code to generate report and to cleanup memory of variables

'########################################################
'****************************************************************